Prabhu Sunderaraman

Fullstack Engineer, Programmer, Writer, Trainer

prabhu.bits@gmail.com,     GitHub     Youtube     LinkedIn
  • Home
  • Profile
  • Books
  • Reading List
Browsing: / Home
Shortlink

HealthyCode October Issue- Interesting lineup

By Prabhu Sunderaraman on September 19, 2014 in HealthyCodeMagazine

HealthyCode magazine is getting better. It has an extremely interesting lineup of articles this october. The highlight of this issue is Interview with Sunil Pai, architect of Myntra. I can guarantee that it’s a fascinating interview.

Here’s the list of articles for the October issue.

  • Moving from SQL to NoSQL by Shani Mahadeva
  • Taste of Sugar.js by Naresha
  • Lambda Architecture by Rajesh Muppalla
  • A simplified Node JS exercise by Prabhu Sunderaraman
  • Baby steps with Raspberry Pi, GPIO by Charath
  • A simple introduction to RubyMotion by Akshat, Abhishek


Share this on: Mixx Delicious Digg Facebook Twitter
Shortlink

MEAN development – Final

By Prabhu Sunderaraman on August 26, 2014 in JavaScript, MongoDB, NoSQL

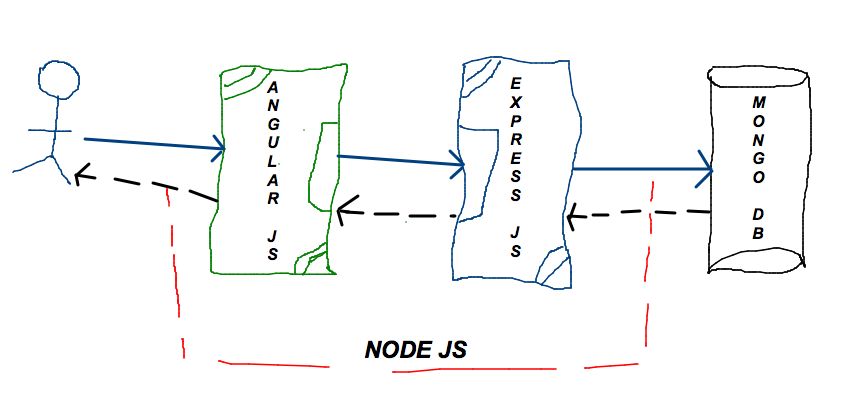
In the last part of the series of articles on MEAN development, let’s talk about the A and N of MEAN.

The N of MEAN (Hello Server!)

Here we go with N of the MEAN stack, NodeJS. Let’s develop a server run on port 8080. This server will listen for requests to add the name of the team and the captain. Let’s create a server.js file in the root folder of our application with the following code:

//server.js 
var express = require("express"); 
var app = express();  require("mongoose").connect("mongodb://localhost/Football"); require("./app/models");  
require("./app/routes")(app); 
var port = 8080; 
app.listen(port); 
console.log("We're all set"); 

The server.js connects to our MongoDB, loads the models and routes, and starts on port 8080. Let’s start our server as shown in the figure. Please remember, your MongoDB server has to be running before you start the Node server. In the figure below, you can notice MongoDB running in the other tab.

05

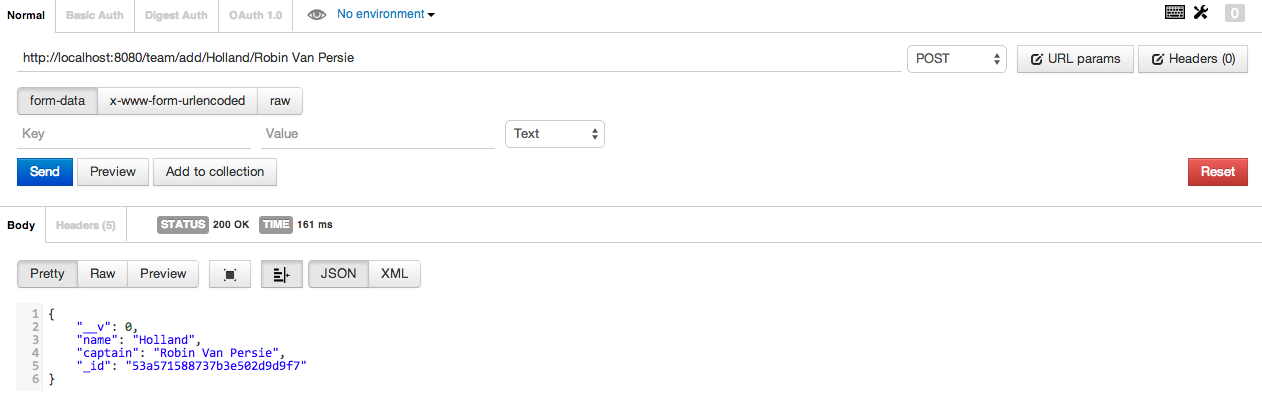
Let’s add a team and captain using a POSTMAN client in Chrome as shown here.

06

Now to the last step; let’s build the UI for the client using Angular JS.

The A of MEAN (Hello Client!)

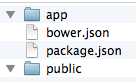
Let’s build a simple UI in Angular JS. Angular JS is a MVC framework for building the client interface. Let’s build a view to enter the team details. This information will be taken to the AngularJS controller and passed on to ExpressJS. The public folder will host the AngularJS related files. In server.js, let’s add the following line to include the public folder:
app.use(express.static(__dirname + “/public”));

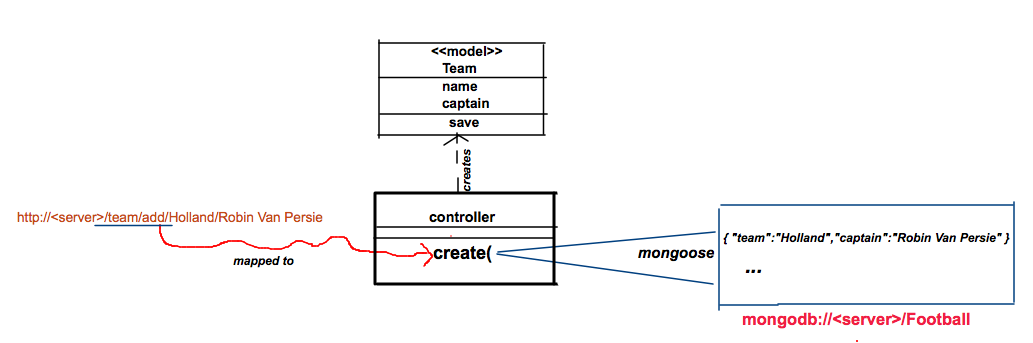
Let’s create a controller class TeamController in controllers.js file. The TeamController accepts the request from the user and sends an AJAX request to team/add/:name/:captain URL.

var  teamApp = angular.module("Football",[]); teamApp.controller("TeamController",function($scope,$http){      
    $scope.output = "";     
    $scope.add = function() {
 	$http.post("/team/add/" + $scope.team+"/" + $scope.captain) 	
	     .success(function(data, status, headers, config) {                
                  $scope.output = data["name"] +                
		                   " with id: " +   
             		            data["_id"] +     
           	     " created successfully"; 
	     }) 
	.error(function(data, status, headers, config) {   
              $scope.output = "Error adding team " +                 
				data["name"];       		  
        });
    } 
}); 

You have a TeamController that uses $http to send a POST request to /team/add by passing the team’s name and captain. We have the add() that will be invoked when the user hits a button from the HTML file that you’ll see in the next section.

Note: In AngularJS, ideally your Controller would talk to Services that will send AJAX requests to the server. But I have chosen to keep it simple for the sake of simplicity.

The last entity is the index.html file that has a form. Here comes the final piece:

<!DOCTYPE html> 
<html> 	
  <head>
     <script src="bower_components/angular/angular.min.js"></script> 
     <script src="controllers.js"></script> 	
  </head> 
  <body ng-app="Football"> 
	<h1>MEAN Football</h1> 
	<hr/>
 	<h4>Add your team</h4>
 	<div ng-controller="TeamController"> 	
     	<input type="text" ng-model="team" placeholder="Team"/><br/> 
	<input type="text" ng-model="captain"  
               placeholder="Captain"><br/> 	
	<button ng-click="add()">Add</button> 		   
        <h5>{{output}}</h5> 		
       </div> 
  </body> 
</html> 

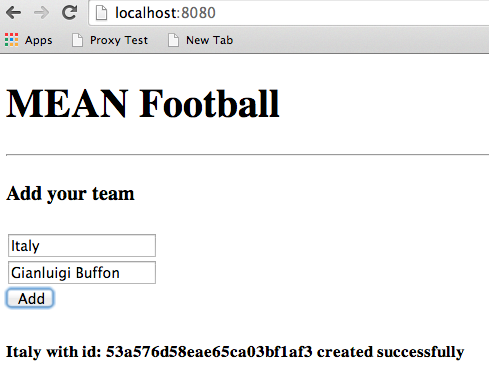
The form is bound to the TeamController. Clicking the button will invoke the add() method in the controller. ALRIGHT! Time to execute the application. Restart your NodeJS server and bring up the index.html in the browser. Enter the values and hit the Add button to see the output as shown here.

07

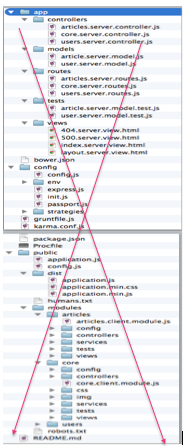
Here’s the application structure after writing all this code.

08
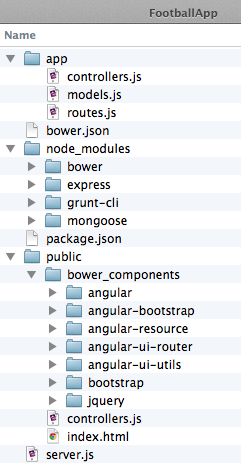
When you download the MEAN framework you would find more files like gruntfile.js for building, karma.conf.js for unit testing and some more configuration files. You can plugin any other JavaScript library into the MEAN application seamlessly.

Final words

I just used a simple text editor to implement this application. No heavyweight IDEs, no complex installation and configuration. Moreover, you just use one language for developing the entire application. You can push this application easily to AWS or Heroku cloud, and that itself is a nice topic for another article. MEAN is definitely changing the face of the development. I would strongly encourage you to take a serious look at it. You can download the complete code for the article from https://github.com/prabhu-durasoft/MEAN-Development.

Share this on: Mixx Delicious Digg Facebook Twitter
Shortlink

MEAN development – III

By Prabhu Sunderaraman on August 22, 2014 in JavaScript, MongoDB, NoSQL

In the previous post we got started with MEAN stack. Now, let’s play with MongoDB and Express JS.

The M of MEAN (Database)

Let’s tackle the M of the MEAN stack, MongoDB. MongoDB is a NoSQL database where you store JSON documents. You can download and get started with MongoDB from http://www.mongodb.org/. We’ll create a new database called Football. So, the connection string that we’ll use is mongodb://localhost/Football. The team’s information that the user feeds in through the application will get added to the Football database. So, for instance, if the user enters the team name as Holland and captain as Robin Van Persie, our application will store the following JSON data in Football database.

{ "team":"Holland","captain":"Robin Van Persie" } 

The Node module that we will use to connect to MongoDB is called mongoose. We will use it in our next section.

The E of MEAN (Server-side)

The ExpressJS is the web framework on the Node platform. As I mentioned earlier, it’s an MVC-style framework. There are a number of features and ways by which you can develop an application using ExpressJS. However, in this article, I want to shed all the flab and just focus on the essentials that would get our job of pushing the team data to the DB.
We’ll begin with developing the models using Mongoose. You can read more about mongoose from http://mongoosejs.com/. The modeling concept in Mongoose is pretty straightforward. You define a class Team with its properties. If you want to add a record, you need to create an instance of Team and invoke the synthesized methods like save.
In the app folder, let’s develop a simple model called Team. I’ll create it in a models.js file.

//models.js 
var mongoose = require("mongoose"); 
Schema = mongoose.Schema;  
var TeamSchema = new Schema({ 	name : String, 	captain : String }); mongoose.model("Team",TeamSchema); 

As shown in models.js, we import the mongoose module, create a new schema and register it as model Team. Creating an instance of Team and calling the save() method does the needful. And where do we write that code? In a Controller.
In the app folder, let’s create a file, controllers.js with a create() method. This method creates an instance of Team and calls it save().

//controllers.js 
var mongoose = require("mongoose"); 
var Team = mongoose.model("Team");  
exports.create = function(req,res){ 	
   var team = new Team({
    "name":req.params["name"],
    "captain":req.params["captain"]
   });  
   team.save(function(err) {
     if (err) {
 	return res.send(400, { 
 		message: "Error creating team" 
	}); 	
     } else {
 	res.jsonp(team); 
     }
   });
}; 

So, the controller creates the model and saves it in the database. Now, we need to invoke the controller. Let’s create a URL mapping for the controller say, team/add/:name/:captain. Figure below shows the URL mapping with the controller.
04
Let’s configure this URL mapping using a Router in ExpressJS. We’ll create a file called routes.js in app folder that has the following code:

//routes.js 
var express = require("express"); 
var teams = require("./controllers");  
module.exports = function(app){ 	app.post("/team/add/:name/:captain",teams.create); 
}; 

Our URL can be accessed using a HTTP POST method by passing the name and the captain of the team. Our little server code is over, but where is the server?

Share this on: Mixx Delicious Digg Facebook Twitter
Shortlink

MEAN development – II

By Prabhu Sunderaraman on August 19, 2014 in JavaScript, MongoDB, NoSQL

In the first part of the series on MEAN, I introduced you to the MEAN stack. In this post let’s get started with the MEAN stack.

JavaScript explosion

The first step towards setting up MEAN is installing NodeJS. You can then download the MEAN stack from http://meanjs.org. A MEAN application will have the libraries (read JS files) plus our JavaScript code. Extract the downloaded archive and what you get is a basic application template that you can get started with. If you’re a newbie, you may also get a mild headache looking at the explosion of JavaScript files in the folders and subfolders as shown here.

02

So I would recommend is to get rid of all the JavaScript files and subfolders and just have two folders, app and public, and two files, package.json and bower.json as shown here.

03

  • The app folder contains the server-side code, i.e., ExpressJS and MongoDB code.
  • The public folder contains the client-side code, i.e., the AngularJS code.
  • The package.json file contains the dependencies like ExpressJS, Mongoose (a MongoDB module, similar to Hibernate or Entity Framework) that we’ll install by running

    npm install

    .

  • The bower.json file contains the AngularJS dependencies that you’ll install by running

    bower install

    If you want to install bower use the command npm install -g bower
    .

Running bower install will install all the Angular JS files in a bower_components folder. As we need the JS files while developing the web pages you can configure bower to install the JS files inside public folder. This information can be specified in a .bowerrc file. The .bowerrc file can have the following configuration:
{ “directory”: “public/bower_components” }

In the next post, we’ll configure our MongoDB.

Share this on: Mixx Delicious Digg Facebook Twitter
Shortlink

MEAN development – I

By Prabhu Sunderaraman on August 17, 2014 in JavaScript, NoSQL

Building a rich internet application using JavaScript for UI, Rails or the Servlets for the server layer is pretty common. How about using JavaScript to build an application from start to end in all the layers? How about making use of the popular JavaScript libraries to build a complete application? The MEAN (MongoDB-ExpressJS-AngularJS-NodeJS) stack helps you do that. In this article, you’ll get introduced to the MEAN stack to develop an application using JavaScript.

Let’s take baby steps

The acronym MEAN corresponds to the four libraries: MongoDB, the NoSQL database, ExpressJS, the server-side web framework, AngularJS, the client-side web framework, and NodeJS, the server runtime.
In the first part of this article, I am not going to explain all these libraries in detail, as that would mean writing a book. Let’s keep it simple.
If you’re already breathing heavily, relax, let’s go slow. Let me help you visualize this. It’s football time, so let’s say you want to develop a simple page that feeds-in the data about all the teams.
We create a web server using NodeJS. In other words, our application runs on NodeJS. ExpressJS is used to build the server-side web application. It’s an MVC-style framework where the controller receives the request, processes it, and gives a response back. So, if you want to add the Brazil team, the data is passed on to the controller. The controller connects to the MongoDB database and stores the data. How’s the user going to feed the data? The user enters his data in a page that’s developed using the AngularJS framework. AngularJS is a client-side MVC library. The figure below shows the components of MEAN in action.

01

Let’s continue with installation the next post.

Share this on: Mixx Delicious Digg Facebook Twitter
« Previous 1 … 27 28 29 … 64 Next »

Youtube Channel


Categories

  • JavaScript (48)
    • RequireJS (5)
  • Go (44)
  • Golang (44)
  • Ext JS (23)
  • Spring (22)
  • Mobile (21)
  • Scala (20)
    • Play (3)
  • Uncategorized (19)
  • Video Sessions (18)
  • GoG (17)
  • Sencha Touch (16)
  • jQuery (14)
  • Languages (13)
  • Java 8 (12)
  • React JS (11)
  • Kotlin (11)
  • HealthyCodeMagazine (9)
  • Video (9)
  • Objective-C (8)
  • NoSQL (8)
  • Android (7)
  • MongoDB (7)
  • GWT (6)
  • Tools (6)
  • HTML 5 (5)
  • Cloud (5)
  • General (5)
  • Micro services (5)
  • Java (5)
  • Books (4)
  • AWS (4)
  • Software Architecture (4)
  • .NET (3)
  • Elixir (3)
  • Docker (3)
  • Reactive (3)
  • NodeJS (2)
  • RoR (2)
  • Backbone (1)
  • AngularJS (1)

Archives

  • 2020 (49)
  • 2019 (7)
  • 2018 (34)
  • 2017 (15)
  • 2016 (7)
  • 2015 (18)
  • 2014 (31)
  • 2013 (55)
  • 2012 (100)

Search

Subscribe


Copyright © 2025 Prabhu Sunderaraman.

Powered by WordPress and News.